Generate Application Projects
Workspace Wizard
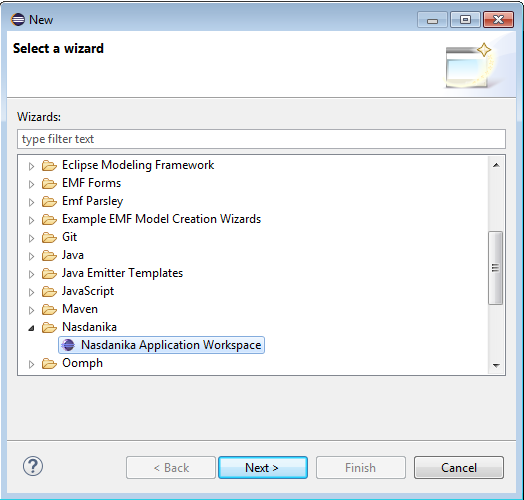
We will switch to the Java perspective and then click "File > New > Other", search for Nasanika, or scroll down to Nasdanika. After that we will select the Nasdanika Application Workspace and click "Next".
General Information Page
This page contains inputs common for all projects to be generated:
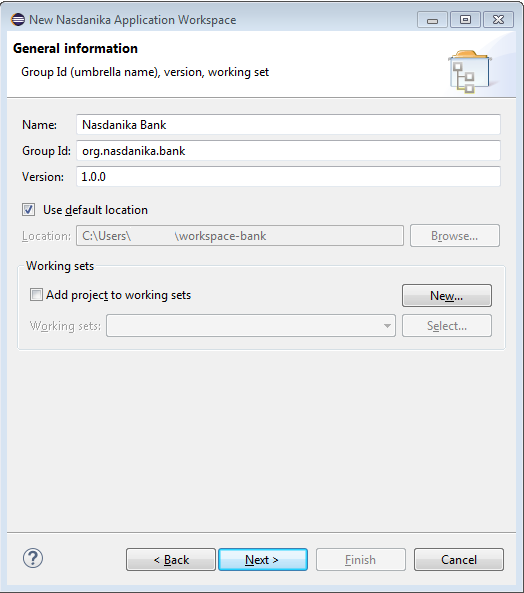
- Name - Application name.
- Group Id - Common part of artifact/bundle ID's.
- Location - A standard Eclipse control group to customize projects location.
- Working sets - A standard Eclipse control group to assign projects to working set(s).
Here we will enter application name and group ID - Nasdanika Bank and org.nasdanika.bank. We will leave other values to their defaults and click "Next".
Projects Page
This page allows to select which projects to generate and their ID suffixes.

- Model - If the Model checkbox is selected, then the wizard generates an empty EMF project for the application domain model. The default value of the model suffix is empty, i.e. the model project artifact and bundle ID is equal to the group ID,
org.nasdanika.bankis our case. - Application - If the Application checkbox is selected, then the wizard generates an application project, which contains routing servlet extension and a number of OSGi components. The default suffix for the application project is
app, i.e. in our case the application project ID would beorg.nasdanika.bank.app. - Tests - If the Tests checkbox is selected, then the wizard generates a tests project with JUnit/WebTest tests, tests feature, and tests product definition. The default suffix for the tests project is
tests, i.e. in our case the tests project ID would beorg.nasdanika.bank.tests. - UI Driver - UI driver consists of actor and page specifications (interfaces) and implementations. The first text field defines the first part of UI driver projects' suffixes. The default value is
ui.driver:- Specifications - projects containing UI driver specifications (interfaces):
- Actors - If the Actors specification checkbox is selected, then the wizard generates a project with actor and actor factory interfaces. The default suffix for the actors specifications project is
actors, i.e. in our case the actors specification project ID would beorg.nasdanika.bank.ui.driver.actors. - Pages - If the Pages specification checkbox is selected, then the wizard generates a project with page and page factory interfaces. The default suffix for the pages specifications project is
pages, i.e. in our case the pages specification project ID would beorg.nasdanika.bank.ui.driver.pages.
- Actors - If the Actors specification checkbox is selected, then the wizard generates a project with actor and actor factory interfaces. The default suffix for the actors specifications project is
- Implementations
- Actors - If the Actors implementation checkbox is selected, then the wizard generates a project with implementations of actor and actor factory interfaces. The default suffix for the actors implementations project is
actors.impl, i.e. in our case the actors implementations project ID would beorg.nasdanika.bank.ui.driver.actors.impl. - Pages - If the Pages implementations checkbox is selected, then the wizard generates a project with implementations of page and page factory interfaces. The default suffix for the pages implementations project is
pages.impl, i.e. in our case the pages specification project ID would beorg.nasdanika.bank.ui.driver.pages.impl.
- Actors - If the Actors implementation checkbox is selected, then the wizard generates a project with implementations of actor and actor factory interfaces. The default suffix for the actors implementations project is
- Specifications - projects containing UI driver specifications (interfaces):
A more detailed explanation of application projects will be provided below.
As before we will leave all selections to their defaults and click "Next".
Application Configuration Page
This page is displayed only if the application project was selected on the projects page. The page allows to customize the application project.
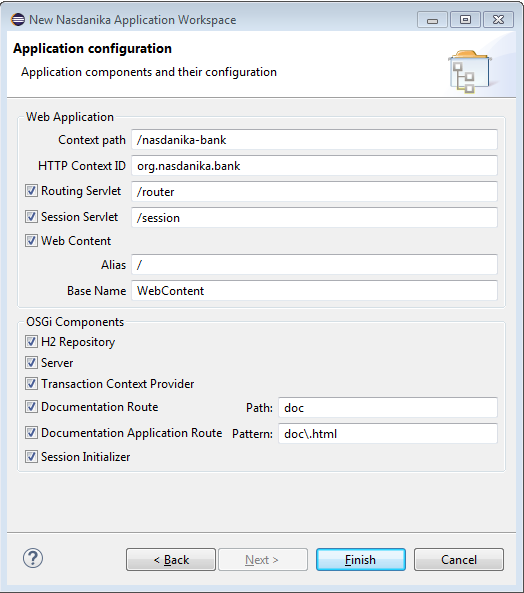
- Web Application
- Context path - Application context path. Defaults to the application name lower-cased with spaces replaced by dashes, in our case -
/nasdanika-bank - HTTP Context ID - HTTP Context is used by the Routing and Session servlets. Defaults to the Group ID -
org.nasdanika.bank. - Routing servlet - If selected an extension for the routing servlet is registered in the generated
plugin.xml. - Session servlet - If selected an extension for the sesion servlet is registered in the generated
plugin.xml. - Web Content - If selected a resource extension for is registered in the generated
plugin.xml, the wizard generatesindex.htmland unpacks content oforg.nasdanika.web.resourcesbundle to the web content directory:- Alias - Web content alias, defaults to
/ - Base name - Location of the web content in the application project, defaults to
WebContent
- Alias - Web content alias, defaults to
- Context path - Application context path. Defaults to the application name lower-cased with spaces replaced by dashes, in our case -
- OSGi Components
- H2 Repository - If selected, the wizard generates a definition of an OSGi component which exposes org.nasdanika.cdo.RepositoryProvider provider service backed by an embedded H2 database.
- Server - If selected, the wizard generates a definition of an OSGi component which exposes org.eclipse.emf.cdo.session.CDOSessionProvider service.
- Transaction Context Provider - If selected, the wizard generates a definition of an OSGi component which exposes org.nasdanika.cdo.CDOTransactionContextProvider service.
- Documentation Route - If selected, the wizard generates a definition of a documentation route OSGi component. The documentation route serves documentation content, but it doesn't provide a container (a web page) for the content.
- Documentation Application Route - If selected, the wizard generates a documentation application route class and a route extension for the class in
plugin.xml. The documentation route generates a container page for hosting the documentation content. - Session initializer - If selected, the wizard generates a definition of an OSGi component which exposes org.nasdanika.cdo.CDOSessionInitializer service. Session initializers are used to register session packages and generate initial repository content.
A more detailed explanation of the application project OSGi services and their interactions will be provided later.
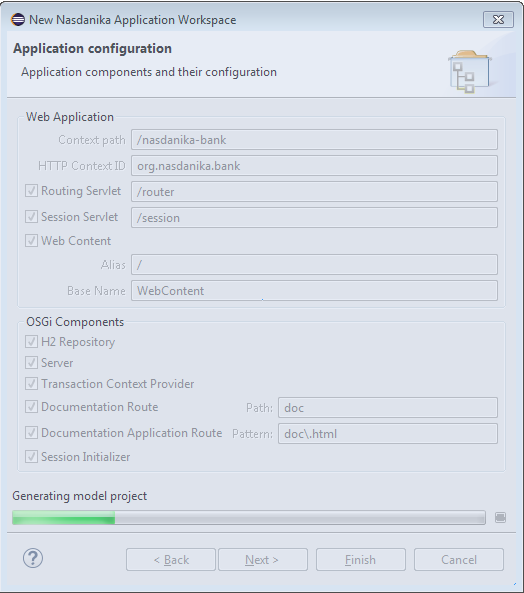
We will leave all values to their defaults and click "Finish". The wizard will start doing its magic and will display a progress bar to notify us about its progress:
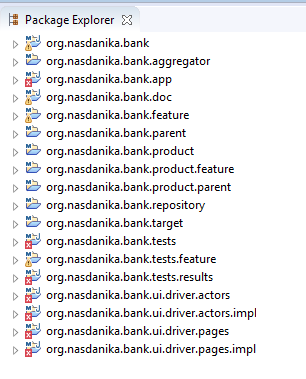
When the Wizard completes there will be 18 projects and some of them with errors:
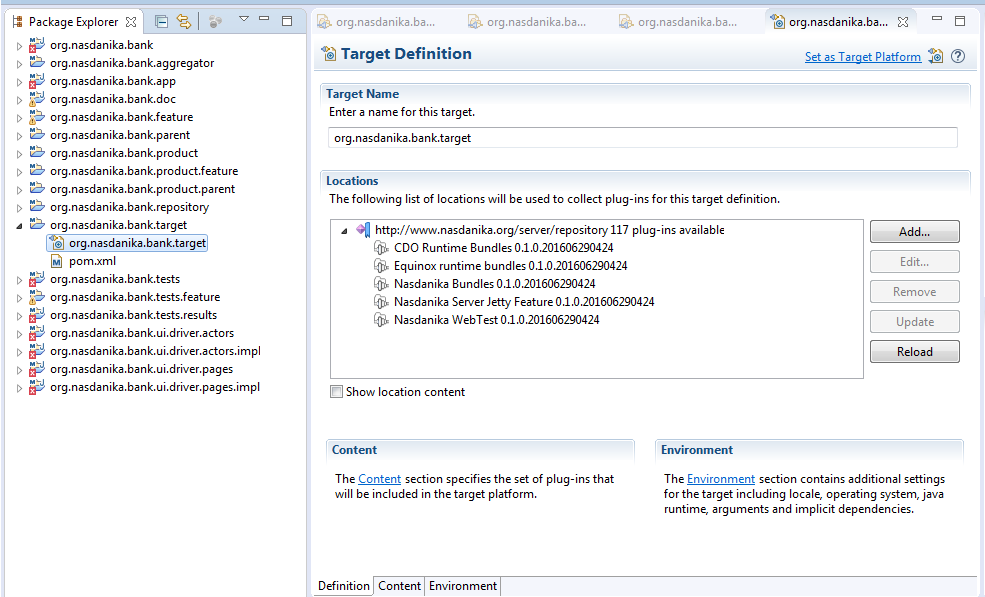
Set Target Platform
To get rid of errors we need to set the target platform. First we shall wait until the target resolves and click "Set as Target Platform".
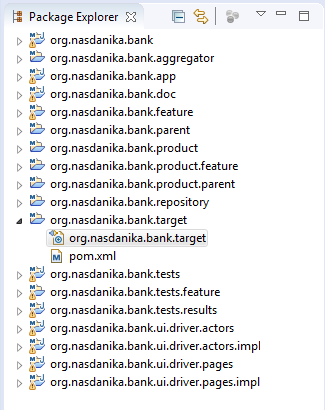
Once the workspace rebuilds, all errors shall disappear.
Summary
So now we have a set of projects which constitute our application. In the next section we will run our application from Eclipse.
A detailed explanation of the role and structure of each project will be provided later.
Additional Resources
- Nasdanika Application Workspace Wizard - YouTube video showing how to generate workspace projects. A bit dated.